29 de abril de 2023
What are the benefits of using SatAgro to plan soil sampling?
The state of your crop is at the same time a result and an indicator of the underlying soil’s chemistry. With SatAgro’s help you can easily plan soil sampling based on biomass variability. The results will be more accurate and can be transformed into a prescription map within SatAgro.
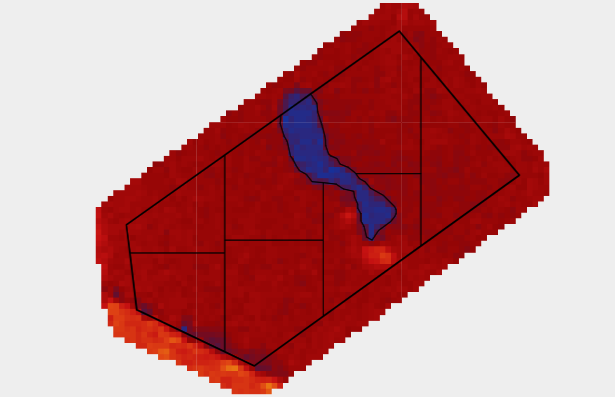
For example, in a particularly wet year parts of the field experience inundation that stops the crop from developing. These wet zones are visible on satellite imagery. The field can thus be divided into two areas, where:
- The current crop depleted the soil;
- No crop developed, and the soil still contains nutrients.
You can take samples from both areas in multiple zones, but maintaining a border between area A and B will result in more accurate soil chemistry maps in the end. Low lying, inundated areas will not be mixed in with dryer areas.
The zoning you generate in SatAgro can be exported to file formats compatible with handheld GPS devices used by soil sampling companies. When you get the results, you can easily transform them into prescription maps within SatAgro.
How to create a field zoning?
- In the “Explorer”, choose a photo that best depictures this year’s crop’s variability.
- Click on the “Create precision treatment” button
- In the precision treatment creator, choose the “Soil sampling” treatment type.
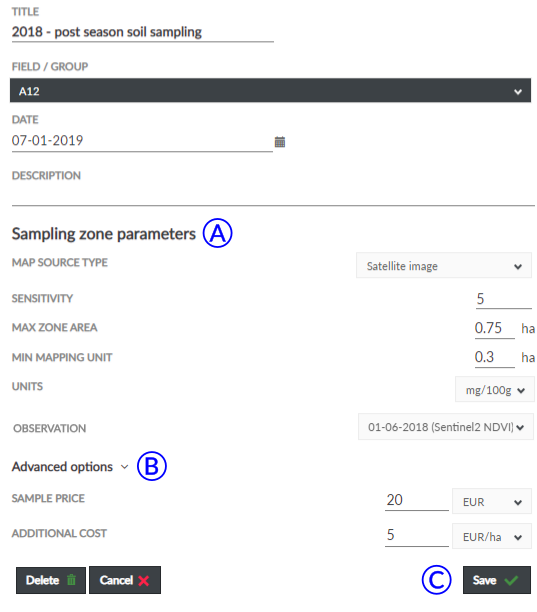
- Specify “Sampling zone parameters” (A) in the panel.
The “Sensitivity” parameter defines the way zones are created:
- High values result in more biomass based zoning
- Low values result in more geometric zoning
“Max zone area” – the upper limit of zone size
“Min zone area” – lower limit of zone size.
- In the “Advanced options” (B), you can enter information the system will use to give you an approximation of soil sampling costs.
Click “Create” (C). After a couple seconds you will be shown the satellite image you chose with the zoning overlaid. If you want to improve some aspect of the zoning, click on “Edit”. The “Sensitivity” parameter is particularly important: it is best to avoid using particularly winding and elongated zones.
To make it easier to carry out the sampling, you can export the zones as well as sampling points in formats compatible with handheld GPS devices. Click on “Download” to save a package of files to your computer.
The zoning you just generated will be visible in the “Diary” section. After you fill out the results you will also be able to view them in the “Explorer” and transform them into a prescription map.
